 If you have a WordPress website, you have maybe heard about the importance of creating a child theme.
When I first heard about this, it was very confusing for me, and I could only find overly technical explanations of how to do this, or ways that did not quite work.
But I eventually found out it does not have to be difficult.
Therefore, I will in this article show you how to create a WordPress child theme with a few easy steps – this is something anybody can do no matter you technical skills.
What you need to know about child themes?
In case, you are not aware, I just quickly want to explain what a child theme is, why it is very important, and when it is relevant to you.
What is a child theme?
If you have a WordPress website, I am sure you know that there are thousands of WordPress themes you can choose from, and these will give you the basic frame and design for your website.
If you have a free theme, the options and features will often be limited, but if you have one of the flexible themes, you can make it look and do more or less what you want it to without coding.
A child theme is then a theme which inherits settings from another theme and selectively overrides features.
This might at first sound confusing, but let’s go into when and why this can be important, and then this will become more clear.
When is it relevant to use a child theme?
You do not necessarily need to use a child theme. It depends what kind of adjustments you do on your website. For a long time I did not even know there was something called a child theme and did not need it.
But if you at some point want to make some changes in for example your php or any other files that are located it the WordPress editor, you need to create a child theme.

If you make changes through the editor, you need a child theme.
There are certain things you need to go here and change.
On OnlineZeroToHero.com, I for example wanted to have displayed “last updated” on my posts with the date when I last did an update, instead if the original posting date, so my visitors can see when the articlse have been updated.
To make this happen I needed to go to my functions.php and add a few lines of code.
I am using the Divi theme, and luckily they have great instructions about how to do this (I am not a coder myself), so I just needed to copy and paste a few lines of code.
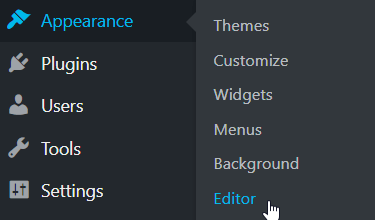
If you at any point need to make any changes through the file editor (see image above), you NEED a child theme first.
Why a child theme is important?
In the scenario above it is absolutely necessary to create a child theme first.
The reason for this is that if you make changes here in your main theme file, they will be lost next time you update your WordPress theme.
This means that you can make changes and everything looks fine. But then you update your theme, and it will all disappear.
When you are not aware of this, you might not even notice the changes you did are not there anymore.
When you have a child theme installed, you will make the changes here. As explained earlier this child theme will inherit settings from your main theme, but you are able to override certain features.
So when you make changes through the editor in your child theme, you will have all the design and settings of your main theme, but when the main theme will be updated, it will not override the changes you did in the editor.
So if you ever make any changes in the editor, it is VERY important to create a child theme first. Luckily it is easy to do.
Can anyone create and install a child theme?
When I first found out I needed to create a child theme, I spend a lot of time looking into options.
Most of the tutorials I found were either overly technical or there were a few steps that did not make sense.
I finally found out how to do it super easily. This means that it definitely is possible for anyone to create and install a WordPress child theme no matter your technical skills.
If you know how to use the basic functions of WordPress, you can definitely also create and install a child theme, if you follow the easy steps below.
4 easy steps to create a WordPress child theme
There are several ways to create a child theme.
I found that the easiest way is by using a plugin. After you have created the child theme, you no longer need to have the plugin installed, so you do not need to worry about an extra plugin slowing down your site.
I tested MANY plugins before I found one that was very easy to use. The great thing about the method I will show you below is that you for example can keep your menu settings after creating the child theme. In many of the plugins I tested, this was not possible.
So let’s go over the steps you need to do.
Step 1 – Install Child Theme Configurator
The plugin I am using for this is called Child Theme Configurator. It has more than 200,000 active installations and good ratings.
So the first thing you need to do is to search for this plugin on your WordPress website and then install it.

Find and install the Child Theme Configurator plugin.
Before installing any plugin, always make sure it is compatible with your version of WordPress.
Once it is installed, you activate it.
Step 2 – Set up the plugin
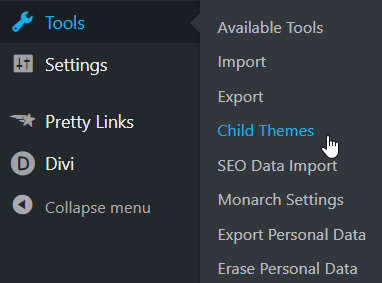
Once you have installed the child theme plugin, you will get an extra sub menu in you WordPress “tools” section. Go here as shown on the image below.

This is where you find the settings for the Child Theme Configurator.
Here you get to a screen with the main settings. You do not have to do much.
You just need to make sure the right theme is selected as main theme. Select the theme you want to make a child theme of.
But if you have that theme activated, it should automatically be suggested. Then you just click the analyze button.

You need to analyze your theme – it only takes a few seconds.
This usually only takes a few seconds, and you will then get a message saying that “this theme appears to be ok to use as a child theme” – then you can continue.
You do not need to do anything with the rest of the settings.
The only thing you can consider is setting 8, where you can choose to copy menus, widgets, etc.

Tick this box, if you want to keep your customized menus and widgets.
This is very useful, if you have a website, you have had for a while and already created customized menus and widgets.
If you want to keep these, you need to tick this box.
This feature is the reason I think the plugin is so great compared to others I tried, as it makes it so easy to keep these settings. On others I tried, I would have to create and set the menus and widgets again.
So tick this box, if you want to keep these setting after installing the child theme,
The last step in the settings is to then click the big button saying “create child theme”.

You then simply click the “create new child theme” button.
It will take a few seconds, and then it says on top of the screen that the child theme has been created successfully.
Step 3 – Activate the child theme
The child theme is so far just created but not activated.
To do this, you go to appearance and themes, where you usually activate themes. Here you will now see a theme called child theme.

You need to activate the new child theme.
As with any other theme, I would suggest to always do the live preview first to see, if everything looks good before activating the theme.
If everything looks good, you activate the theme.
And now you have a child theme installed and activated.
Step 4 – Make the changes you want to
Now you have a child theme, and any changes you make in the file editor will stay, when you update your theme.
So you can now make the changes you wanted to:-)
After you have created the child theme, you do not need to have the plugin installed anymore. You can deactivate or delete it, as there is no need to have any plugins activated that are not currently used.
Final thoughts
This is how easy it is to create a WordPress child theme.
When I finally found the right plugin and method, it was a relief for me. I tested many ways and tried several plugins, and I found this method to be the easiest and fastest way to do it.
Just remember before making any bigger changes on your website or installing something new, it is always best to make sure you have a full backup of your website – better safe than sorry.
So now it is over to you – go ahead and create a child theme for your website:-)
If you have any comments or questions, I would love to hear from you in a comment below.

