 If you want traffic to your website, the best long term approach is to get good rankings in Google.
To be able to get good rankings, you need to make sure Google (and other search engines) can find and index your website. Without indexing – no organic traffic.
Therefore, you have to know how to index your website on Google, and in this article I will show you how to do this fast in a step-by-step guide.
It is not as difficult or technical as it might sound, so do not worry if you are not a technical genius. With this guide you will still be able to get your website indexed quickly.
Why it is important to get indexed on Google.
Before getting to the steps you need to do, I just want to make something clear – there is a difference between ranking your website and getting your website indexed.
Ranking means to use search engines optimization to increase you chances of high rankings (and thereby get a lot of organic traffic and potential income). I have written a whole guide about ranking your website, so check that out if you want to know more about this.
This article is instead about getting your website indexed. Indexing is important because, if your website is not indexed by Google, it means that Google has not read your website and does not know you exist. If that is the case, you will not get good rankings.
So indexing is important as your website cannot be found, if it is not indexed. I have seen examples where people had a great website, but no traffic because the indexing had not been taken care of. So make sure that you do not skip this step.
How to get indexed?
There are different ways to make sure your website gets indexed. I will go over the steps below.
Step 1: Make sure your website is not blocked from indexing
Before you do any of the other steps, you need to make sure your website has not blocked the search engines. You can ask the search engines not to read your website, and this is often very practical while you are developing a website. You do not want the search engines to read and try to rank a website that is not ready for it.
I have however seen that sometimes people forget to open up for the search engines again. I have even seen web agencies forget this when developing a website for a client. Therefore, you need to be able to check this.
If you have a WordPress website, it is fairly easy to see, if you have blocked the search engines. You go to the settings and “reading”.
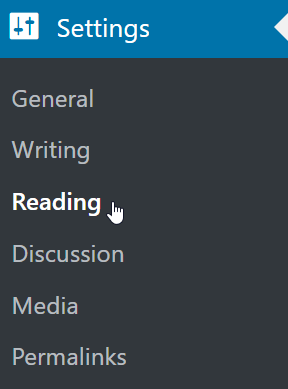
Go to the “reading” settings in WordPress.
At the bottom of that page, you will find a setting called “Search engine visibility”.

Make sure you have not discouraged search engines from indexing your site.
If there is a tick in this box, it means that you have blocked the search engines from indexing your website. So untick the box and click save.
If you do not have a WordPress website, you can instead check by using the same tool, you will be using to index your website (I will show this below).
Step 2: Get indexed fast or be patient
After you have made sure your website can be indexed, you have two options to make it happen. That is to take action and do something to make it happen fast, or you can be patient and wait.
If you do not do anything, Google will eventually find your website and index it. It is difficult to say exactly when that will be, but it can be anything from a few days to a couple of weeks. It is the same every time you post new content – you can just wait, and eventually Google will index the new content.
However, why not make sure that it happens faster. You can do this by using a free tool from Google itself. It is called Google Search Console (formerly know as Google Webmaster Tool), and it will help your website and new content get indexed faster.
But that is not only advantage of using Google Search Console. This tool will also give you information directly from Google about how the search engines view your website. You will for example get messages, if you have blocked the search engines, you will be told, if there are any errors on your website that makes it difficult to index, and it gives a lot of very useful data about the search traffic that is coming to your site, as you can see exactly what phrases people that are coming to your site have searched for.
Below, you can see a small promo video of Google Search Console to see more about what it offers:
Personally, I think this is a must have tool, if you have a website. And especially if you have an online business.
Bing has a similar tool that you can use to check your websites performance in Bing and Yahoo. It works similarly to Google Search Console, but there are some differences. In this article I am however just focusing on Google Search Console, and then I will go over the Bing Webmaster Tool another time.
So let’s go over how you start using Google Search Console.
How to set up Google Search Console?
Before you start to set up Google Search Console, you should make sure to have Google Analytics installed on your website. Together, these two free tools from Google will give you very valuable data, and I highly recommend you to make sure to have both installed. Having installed Google Analytics will further make it easier to set up Google Search Console.
Step 1 – Make sure you have a Google account
As Google Search Console is a tool from Google, all you need to be able to use it is a Google account. If you have installed Google Analytics, you will already have an account. Or if you have a gmail account, you will also have an account.
Since I am assuming that you have already set up Google Analytics on your website (if not, just click the link above and see how to do it), I will not go more into details about this step here, as that means you already have a Google account.
Step 2 – Make sure your website has a sitemap
To use Google Search Console, your website needs to have an XML sitemap. This is a kind of file that will show all the content on your website, and it makes it possible for Google Search Console to read your site easily.
There are several ways to get this sitemap. Some websites have it automatically, because of the system they are built in. You can easily check if that is the case for you – just open the browser and type in yourdomain.com/sitemap.xml. If you then see a long list of pages and files, you have a sitemap.
If you have WordPress, you can get a sitemap by installing a plugin for it. Just search for xml sitemap in the plugin section and find one that has recently been updated and has good review. Personally, I prefer using the All in One SEO plugin, as it does not only give you a sitemap, but also a lot of ways to improve your SEO.
If you do not have WordPress, and you do not automatically have an XML sitemap on your site, I would recommend to just do a quick Google search for XML sitemaps on the system your website is built in, as I cannot go through every single system here. But you can easily find a solution, as it is an important feature that all systems will have easily accessible.
These are the basic steps for setting up your account. Once you have done this, you need to submit your sitemap.
How to submit a sitemap to Google Search Console?
To submit your sitemap, you need to go to the Google Search Console tool.
Once you go there, you just need to login with your Google account. You now need to add your website. This will be the same process, if you want to add more websites later. You can use the same account for many websites – you just need to add a new site every time, and then you will have easy access to them all by going to Google Search Console.
Step 1 – Add your website in Google Search Console
The way to add your site is by clicking the button that says “add property”.
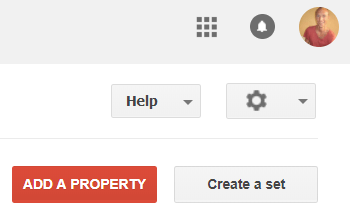
It will be in the top right corner. After you click the red button, a box comes up, where you have to paste the URL/address of your website.
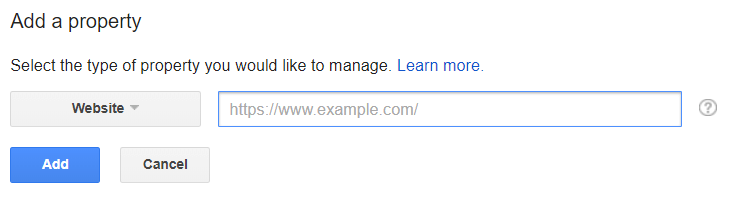
Make sure to copy it from the browser, so your are sure to get the full URL. Once you have done this, you just simply click add.
You now need to confirm that you are actually the owner of the website. You have several methods to do this, and they will all be described in Google Search Console. I however prefer the easy method which is by using Google Analytics to confirm the site.
To do this, you just click the “Alternate methods” tab. Here you click the “Google Analytics” option. To use this option, you need to have Google Analytics in the same Google account as you have Google Search Console. After you have done this, you just click “verify”.
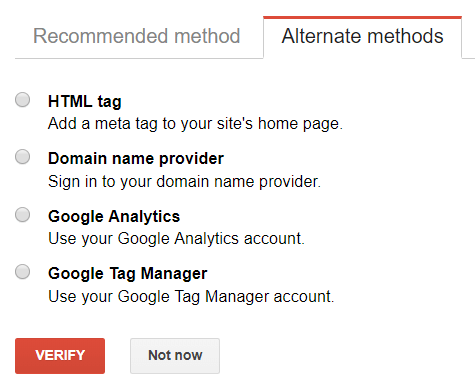
Verifying your website with Google Analytics is fast and easy.
After a few seconds you should get a message on the screen that your website has been verified. That is how easy it is.
If it does not work for you, or if you prefer another method, you can see on the Google Search Console how to use the other methods.
Step 2 – Submit your sitemap
Now you need to submit the sitemap – this is the last step, so everything is soon setup.
In the menu, you need to find the “sitemaps” option.

You now need to write the URL of your sitemap. As mentioned, it will in most cases be yourdomain.com/sitemap.xml, if you have not changed any settings. In your website system, you will be able to see the URL, if this one does not work.
Now your sitemap has been submitted, and Google will know about your site and will start collecting data and send you messages, if there are any errors.
What are the next steps?
Following the above will make sure your website gets indexed fast, and you will also get a lot of really valuable data.
To benefit the most from Google Search Console, you should however keep using it. If you have big changes on your website, you can resubmit the sitemap, so Google will be able to know about the changes faster.
Also, every time you have posted a new article on your website, you can use Google Search Console to tell Google about it, and this will help you to get index and eventually rank faster.
To do this, you need to find the “fetch as Google” option in the menu.

Then you paste in the URL of your new post or page and click “fetch”. Then you click “request indexing”, and a few minutes later Google will visit your post and index it.
In addition to that, I can only encourage you to look at all the statistic Google Search Console will give you. It takes a few days before any data will start showing up, but after a while you will be able to find very detailed info about how people find your website, which pages that are the most popular, your average rankings in Google, and more.
Final thoughts
If you have a website, I strongly encourage you to use Google Search Console. It is a free tool and can help you business and website development a lot.
Even if you at the moment are not sure how to use all the statistics that you will eventually get, it is great to have it installed as soon as possible. Both to make sure your website gets indexed and thereby makes sure that you have the chance of getting good rankings, to start gathering data, and to be able to get messages from Google, if there are errors on your site.
So just go through the steps above, and I promise you will thank me later for having this amazing free tool:-)
If you have any comments or questions, just leave a comment below. I will be happy to help you out, if you need any help.


Thank you, this was very helpful and informative! I’m new to blogging and i can use this type of advice. I appreciate it.
Thank you Katie. Glad you found the info useful. If you ever get any questions during your blogging journey, just come back and ask, and I will do my best to help.
Mikael
I wrote a post about low competiton keyword. After publishing the post my website rank on the third page of google (after 4 days) – do I need to do anything other than this?
Waiting for your valuable reply
Hi Akhil,
No you do not as such need to do anything else. How quickly you will be able to rank higher depends on a lot of different things – among others how often you post, how old your website is, the quality of your content, and more. Just make sure you have optimized your article for the search engines, and then keep working on your site and quality content. Then over time your articles will rank higher.
All the best,
Mikael
In simple words – Google is the main search tool widely used by billions of people, so when you post an article, you want to be seen by as much people as possible. You can earn a lot of money in a lot of different ways with the help of Google. Thanks for the article, it was interesting.
Thanks for stooping by and for the feedback. It is definitely possible to earn in many different ways once your have a good amount of traffic.
All the best,
Mikael