 You have probably heard that it is important to get an SSL certificate for your website.
And maybe you have even looked into it, and think it looks very complicated to do it yourself, or very expensive if you want to hire someone to do it?
But it does not have to be that way – if you have a WordPress website, you can in most cases easily take care of it yourself, even if you do not have many technical skills.
In this article I will show you step-by-step, how you can easily install SSL on WordPress, and how you make sure it works.
Why you need SSL on your website
In case you do not already know, why you need to have SSL on your website, let me just quickly explain this, as there are a couple of important reasons.
First of all, SSL means Secure Sockets Layer, and has to do with the security of your website. In short – when you have a working SSL certificate, your website is more secure. That is good for both you and the visitors.
An easy way to see the current state of your website or any other website is to look at the URL of the website. If it does not have SSL, it will say http://yourdomain.com. If a website has SSL, it will say https://yourdomain.com + it will have a green padlock and say “secure” in front of the website URL.
This is how a website URL looks, when it has a working SSL certificate.
For this reason, you will often hear people talking about changing from http to https. That is just another way of talking about an SSL certificate.
Having the green padlock and the label “secure” of your website URL is important – just think about how you feel when visiting a website. More and more people are becoming aware that websites need to be secure. How do you feel about visiting a website where it does not say secure?
Many people might still not know to look for this, but more and more people will start noticing. So it is better to just get it done, so people can feel secure when visiting your website. Furthermore, search engines even sometimes give security warnings, when people try to visit websites without SSL. If people get a security warning when trying to enter your website, you can be sure that they will quickly click the “back” button.
Another very important reason to have SSL is that Google has announced that it is a ranking factor. That means that websites that have SSL will be prioritized over websites that do not have it in the search results. That does not mean you cannot rank your website without SSL, but it means it will be increasingly harder. It already takes a lot of work to get good rankings, so why make it harder for yourself.
What can go wrong when you change to SSL?
Now you know, why you should definitely consider getting SSL on your website. Before we get to the guide about how you can do this easily on your WordPress website, let me first explain what can go wrong, when you activate your SSL certificate.
There are two things that you have to be aware of:
WordPress SSL mixed content:
When you activate SSL on a WordPress website that you have had for a while, you will in most cases experience what is called mixed content issues.
That means that even when you have activated the certificate, you will still not see a green padlock on your website. That is because it is not working properly. This often comes from images that you have uploaded before you activated SSL. In most cases you can take care of this issues by uploading the relevant images again (use the tool I show later to test which images). However, if you use the easy method, I will show you below, you will not have this issues, as it automatically takes care of mixed content.
Redirecting from http to https:
When you change from http to https it is technically two different website addresses. Therefore, you need to do redirects, as you can otherwise lose rankings and traffic, as the links pointing to your website will no longer go to your website.
Some hosting companies take care of this automatically. I personally have Wealthy Affiliate as host, and the support there took care of all that, when I changed my website to https. So if you are lucky, your hosting company will take care of this. But if not, the method I will show you below also takes care of it automatically.
What does a SSL certificate cost?
Some hosting companies charge quite a lot of money for the SSL certificate. But there are luckily also some that offer a free SSL certificate for WordPress. My hosting company I mentioned above offer this for free, but there are also more and more other companies that offer this.
There are however still companies that charge several hundred dollars a year for an SSL certificate, so check with your hosting company. If they charge a big amount, you can consider changing to one that offers it for free, unless the hosting company has exceptional good service, or you just really like them.
I would definitely recommend finding a host that offer it for free, as it should be standard by now.
How to install SSL on WordPress for free?
Now we get to step-by-step guide about how to install SSL on WordPress. I know that some web agencies charge a lot of money to do this, as people are afraid it is too difficult. But the truth is that it is not very difficult, and it usually does not take very long.
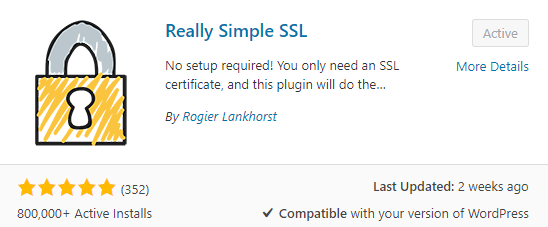
The great thing about WordPress is that you can find a plugin for more or less anything – and there also is a free WordPress SSL plugin called “Really Simple SSL”, and it works really well and is super easy to use.
Before you start – the plugin is only relevant, if you are installing SSL on a website, you have had a for a while. If you are building a brand new website, it is very easy. Then you just need to activate the SSL certificate and start building your website. Then it should automatically work.
But let’s now go through what you need to do to get SSL to work on a website, you have had for a while.
Also, be aware that this will work for many websites, and I have used it for a couple of my own smaller websites without any problems. But there will be cases where it can cause issues. If it does not work, or if you have a really big website, you should reach out to your hosting company – checking what options they have is a good idea to do even before you use the methods below.
Step 1 – Activate the SSL certificate
 First step is to activate your SSL certificate. This is something you have to do at the hosting agency. If they supply SSL for free, it will usually just take one click to activate it.
In some cases it can however then take some hours before it will be activated, but that depends on your host. So check the details with them.
Step 2 – Install plugin
Go to the WordPress plugin section and find, install, and activate the Really Simple SSL plugin.

Step 3 – Run the plugin
The standard settings on the plugin are fine in most cases, so all you have to do is to click “go ahead”.

The great thing is that the standard settings will take care of mixed content issues and redirects, which are some of the most common errors.
So this is a simple as it is – your website should now say https and have a green padlock.
Yes really – that is how easy it is!
Step 4 – Change you settings in Google Analytics and Google Search Console
After SSL is working, there are a couple of things you need to do.
Remember, as I mentioned earlier, that once you activate SSL, your website will technically have a different address. That means that if you already have Google Analytics or Google Search Console installed, you need to change these settings to https – if not, you will stop getting data.
If you do not already have these two free tools, just click the links above and read how to install them. They are tools everybody with a website should have.
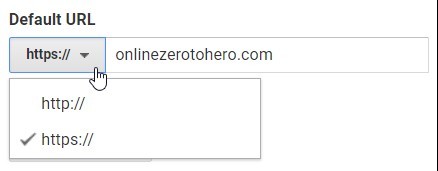
In Analytics, you just simply need to change the address in the website settings to https instead of http. Go to admin => property setting => set the default URL to https.

Remember to change to https in Google Analytics.
In Google Search Console you need to add a new property, as if it was a new website. It will then take a couple of days, before it starts collecting data. Do not delete the old property for a while – you still need to be able to access this data until the new https property has collected enough.
Make sure to test if it works
As you can see, it does not have to be complicated to get SSL. But just to be sure, you should go on your website and click around a bit. It should have a green padlock on all pages. And if you have used the plugin above, it will have taken care of the most common errors.
If you on some pages do not see a green padlock, you can use this free online tool to test why. It will show you what kind of errors you have – for example it will show which images that gives mixed content issues.
Final thoughts
As you can see, you should definitely make sure to have SSL on your website. And the great news is that it does not have to be complicated.
I have used the method above myself for a couple of smaller websites I have, and it has worked perfectly. For most smaller websites, this will be a great and easy way to do it, and you do not have to hire an expensive agency to do it.
If you have a bigger website or webshop, I would consider having a talk to your hosting company first. If you have a small (and cheap) hosting package, the support might not be so good. But if you have a bigger hosting package (and more expensive), they give good support in most cases and might be willing to help you find the best solution for you.
I had a big website with a lot of content, I needed to activate SSL on, and the support of my hosting platform Wealthy Affiliate did all the hard work, and I did not even have to use the plugin, as that platform does everything automatically. So if you have a bigger website, it can be good to check with the hosting company. In other cases, the above method is great and easy.
If you have any questions, comments, or need any help, just leave a comment below. I will be more than happy to help you out.

