 Having great images and photos are important for any website.
But what is sometimes forgotten is just how important it is to optimize your images the right way.
If you do not do this, you miss out on a lot of potential benefits, and you can even risk hurting your website and your chances of getting traffic.
In this article, I am going to show you step-by-step how to resize and optimize images for websites, so you will get all the benefits images can give.
I will show it step-by-step, and it is something anybody can do, and I will show you how to do it using completely free tools, so no need to buy any expensive software.
Why it is important to resize and optimize images for web
Preparing your images before you upload them to your website is very important for several reasons.
Most of these reasons have to do with your how to get good rankings in the search engines like Google, Bing, and Yahoo, but also have to do with how user-friendly your website is.
Let’s say you have a photo you have taken yourself, or you have maybe downloaded it from a stock photo platform. If you download the images, you can sometimes choose the file size, but if you have taken the photo yourself, it will often be a very big file.
The way to see the size of your images is to either hover over it with your mouse in the folder, where it is saved or by right-clicking (on PC) and see properties.

You can see image file sizes by hovering over with your mouse.
The image above shows the file size of that particular image is 2.94 MB and the dimensions are 5610 x 3740 pixels.
This might not mean a lot to you, but it would be a very big image to upload to your website.
Many people think that when they upload the image, it is enough to just make the size of the image smaller, which is possible in many website systems – so they would upload and then choose the image should just show in, for example, a size of 500 x 333 pixels. This is a huge mistake.
It will make sure your website shows an image that design-wise has a good size, but the file size will still be the same. And if you often use images that are this big, it will really slow down your website.
Why it can hurt your site to slow it down:
Speed is a very important factor when it comes to ranking in the search engines and for usability, and one of the easiest ways to make sure your site is not too slow is to optimize your images, so the file size is not too big.
Furthermore, with images as big as the one I showed above, the users will also notice your site takes long to load. People are not very patient online today, so if your site takes just a couple of seconds too long to load, they might already have hit the back button and moved on to the next website.
So for these reasons, it is very important to make sure your images are not too big.
Do not miss out on extra SEO benefits:
Another big advantage of optimizing your images is that you can gain a lot of extra SEO (search engine optimization) benefits from it.
Images contain data, and if you let the search engines know what is on your images, it makes it easier for the search engines to understand what your website is about and thereby show it to people who are looking for this topic.
So as we are going through the optimization steps below, I will also show you how to make sure to get these extra SEO benefits.
Getting your images ready for the web (step-by-step)
Now you know why it is extremely important to not just upload your photos to your website without optimizing them first. So let me now show you how you can easily do this yourself.
Step 1: Resize images for websites
The first step is to resize your image. The image I showed above has a size of 5610 x 3740 pixels.
Pixel is the way to measure the size of images, but you do not need to know more about this in details. As you work with your website, you will slowly get used to what pixel means.
But what is then the right size of an image?
That very much depends on your design and website. Some website templates will tell you what sizes are recommended, and on others, you have to test and see how it looks.
But I can tell you that more than 5000 is way too big for websites. On this website, I use many sizes depending on the context, but often the images are around 600×200 or 300×200, but it very much depends on the context and design what the exact size should be for you.
What is important to know is that you should resize it to reduce the image file size to get all the benefits I mentioned above.
It is luckily easy to do, and you do not need expensive software to do it.
If you prefer to have a program you can download, I recommend you to check out the free tool IrfanView (only for Windows), or you can use the free online tool Pixlr.
But there are also many other great and free tools, you can use to resize your images if you do not like these two. Most computers have a program like paint or similar installed as default and this can also be used for this.
You, in general, need to look for the image options in the menu of your chosen tool and find the resize/size option:
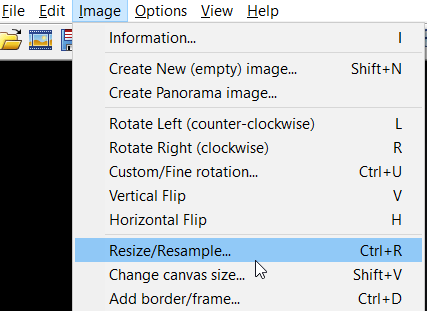
How you find the resize option in IrfanView.
No matter the tool you are using, you should now have the option to resize.
So just write the pixel size and click “ok”. After this, you can save the image as a new file, and then you are ready for step 2.
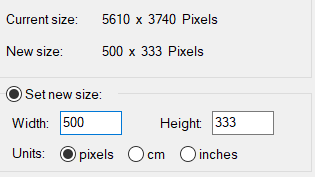
Change image size.
In the beginning, you might have to test a few different sizes, until you find out what sizes are the best for your website design, but luckily it does not take long to do.
Just make sure to not overwrite your original file – then you can always go back to this and make a new image with a new size.
Step 2: Optimize your images for the web
Now your image has the right size. This will already have reduced the file size a lot, and it could potentially be uploaded to your website now, as it is a lot better than before, as it now only has a size of 71.3 KB.

After resizing the image file is already a lot smaller.
But since we want to optimize our images and website for the best possible performance, we want to compress and optimize it further (of course without losing the quality of the image).
There are several ways you can do this. Personally, I have Wealthy Affiliate as a hosting platform, which includes a content writing tool, where I can upload images, and then they are automatically optimized.
But there are also other tools available that are easy to use. If you have a WordPress website, you can, for example, use the EWWW image optimizer plugin.
I will, however, show you an easy manual way, you can use no matter what as I find the manual way of doing it gives better results than the plugins that do it automatically.
This is by using a free online service called TinyPng. Once you have resized your image, you just go to TinyPng’s website.

You can use Tinypng to optimize your image further.
Here you can upload your image, or you can upload several images.
It will then take a few seconds to compress the images, and you will then be able to download an optimized image. This will NOT negatively affect the quality of your images.

After your image is compressed, you can easily download it.
In this case, it saved me 48% of the file size. How much it will save you depends on the image, but I have had cases, where it has saved me up to 80%.
This is a lot to save over time, and it can have a very positive effect on your website’s performance to compress and optimize your images like this.
Step 3: Give your images relevant names
Now your images are almost ready to upload and use on your website. We just need to do one last thing to help us in relation to getting rankings in the search engines.
The search engines cannot as such see what are on images. Therefore, we need to tell them – one way to do this is by giving our images relevant file names.
As a standard, most images have a long number or strange characters as a file name. By changing this into something that explains what is on the image, we help the search engines understand what our website is about and can help us rank.

Make sure to give your images relevant filenames instead of leaving the default long number.
So make sure always to give your images relevant file names and never upload images that have a long weird number as a name.
Final thoughts
Resizing and optimizing images for your website is very important. It is, unfortunately, something many people do not know about or forget when they first start building a website or online business.
But it is easy to do, and you can do it with free tools, so I really recommend you to start doing this, to make sure to optimize your website the best possible way and increase your chances of getting good rankings and a lot of traffic to your website.
If you want to know more about what you can do to increase the chances of ranking, I have written a comprehensive SEO beginner guide that will show you a lot more steps you can start doing to improve your website right away.
If you have any comments, questions, or need any help, just leave a comment below, and I will get back to you asap.


This was very informative. I knew that you could optimize your images to improve your SEO, but one thing that I learned from this post is that really large images can slow down your website. I try to keep my images about 500X300 pixels because I like how it looks on the page. Thanks for teaching me how to resize an image!
Thanks for the feedback Melinda. Glad you found the info useful.
All the best,
Mikael
Hi Mikael,
Thank you kindly for the excellent tips and lesson in this article. I can see fully how this will help me. But…and this is a big but….
…I already have 200+ pages on my site and minimum 3 images on each one, thus not much short of a thousand images to optimize and process. Is there something that can do this in bulk, and of course save me time by doing it automatically as I upload a new image?
Hi Derek,
very good question. If you already have that many images, I would suggest you to look into the EWWW plugin (see link in the article). It can compress the images automatically. It can of course not give the files a different name automatically, but it can take care of the big files and compress them to make your site faster. So would suggest you to check out that plugin, if you have a WordPress website.
All the best,
Mikael