 If you have a WordPress website, you might need to add new users if you need other people to log in to the site as well.
It is luckily not very difficult to do and you do not need any special technical skills to do it.
In this article, I will show you step-by-step how to create a new user on WordPress.
Once you know how it is done, it will take you less than a minute to do.
There are, however, a few things you need to consider first, and I will also go over these in this article.
Why consider creating new users in WordPress?
If you have a WordPress website, the main reason to consider adding another user is if you need somebody else to be able to do some editing on the website.
I sometimes have other people helping me out with tasks here on OnlineZeroToHero.com, and I, therefore, have had to add a new user when I needed that help.
I have also at times needed access to other people’s websites when I have helped them out with tasks as a freelancer.
So having more users on WordPress and knowing how to create a new user is very useful if you ever need someone else to access your site to help you out, or if you need access to other sites to help them out.
There is, however, one important thing to consider before you add a new user – and that is what kind of right you should give the user.
The different user rights
Before adding a new user, you need to consider what you need help with and what kind of rights you want to give the new user.
If you give access to somebody you do not know very well, it might be a good idea to limit the things the person can do.
Also, if it is a person that does not know WordPress very well, it might be a good idea to limit the access so the person does not accidentally end up deleting or messing things up.
There can be many reasons to give different rights to different users, and luckily WordPress makes it easy to control this.
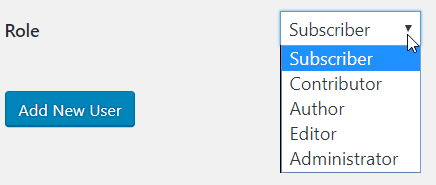
You can as a standard choose between 5 different roles to give a new user.

The 5 WordPress roles you can give a new user.
Below I will just go over these roles quickly, so you have an understanding of each of them and when it might be appropriate to use each of them.
Option 1 – WordPress Administrator
The administrator role will give full access to the user and give the same access as you as the owner have. That also means it gives the person the right to create and delete other users.
I would only recommend giving this to others if it is really necessary.
There can, however, be many cases where it is necessary. When I, for example, help other websites with search engine optimization, I in most cases need full access.
There are different things I need to be able to adjust in the settings, and I cannot do this without admin access.
So it can be necessary to give this role to others, but just make sure it is somebody that knows what they are doing.
Option 2 – Editor
The editor role is good to give to someone that needs to help you manage the content on your website.
An editor can edit, create, publish, and delete posts and pages. Also, posts and pages created by other users.
They can also manage comments and categories.
But an editor cannot adjust the overall settings and can, for example, not install a new plugin or theme.
Option 3 – Author
The author role is great if somebody needs to create new content on your website and set it up for you.
An author can create new posts, upload images, edit their own posts, delete own posts, and publish own posts.
But an author cannot edit posts created by other users and can also not publish posts created by other users. Also, an author does not have access to any of the overall website settings.
Option 4 – Contributor
A contributor can only read, edit, and delete the posts he/she created him/herself.
But he/she cannot upload new media files or publish posts.
So it has very limited rights and is mostly useful if you have somebody that just needs to put some text on your site but without doing much more about it.
Option 5 – Subscriber
The last role, and the role with the least rights is the subscriber.
This does not really give any editing rights but just access to read the posts. It is, therefore, not very useful if it is because you need help with your WordPress website.
But it is sometimes used for websites that have subscription-based sites where only certain people should see certain content.
How to add a new user on WordPress (step-by-step)
Now you know what kind of roles and rights you can give to new users, so let’s now go the simple steps you need to create a new user.
Step 1 – Go to the user settings
You first need to find the user settings.
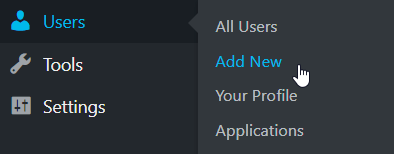
They are located in the left side menu in your WordPress dashboard. It is just simply called “users” and by hovering over it, you get a few options.

This is where you find the user settings.
Here you click “add new”.
Step 2 – Fill out info for the new user
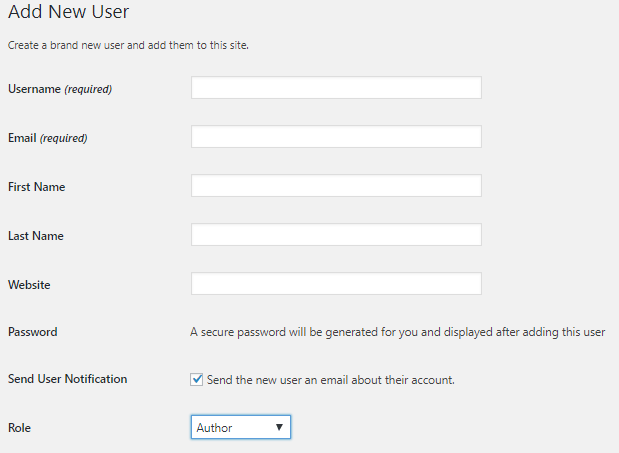
Once you have clicked to add a new user, you will get to the info you need to fill out to create a user.

The info you need to fill out to create a new user.
The only required fields are the username and email.
You can choose to fill out the rest of the info but it is not necessary.
You can choose to create a password as well or choose to have a password automatically generated.
At the bottom of the settings, you choose if the user you add should automatically receive an email once you add them or not. And then you need to select the role of the user as described above.
It really only takes two minutes to fill out as long as you know the email address of the person you are adding and have decided which role to assign to him/her.
Step 3 – Add user and let them know
The last step is simply to click the “add new user” button.

The last step is to simply add the new user.
If you have ticked the box in the step above, where it asks if you want to automatically send an email to the new user, that person will get an email from WordPress saying they have been added.
If not, you just need to write them and let them know yourself.
But that is basically it – very easy, right?
Once you have followed the steps above once, you will be able to do it in just a few minutes.
How to delete a user that no longer needs access?
I just wanted to include a small section here in case you at some point need to delete a user.
If you have hired someone and given them access but they no longer work for you, there is no need to have them as a user. Then it is, in my opinion, better to just deleted them.
Luckily this is even easier than creating a user.
You just go to the user settings in the sidebar as I showed you in step 1. This time instead of clicking “add new”, you click “all users”.
Now you get an overview of all the users that are on your website. This is also where you can click and edit the info and role of one of the users if you need to.
This is good to remember as you might give a role to a new user that needs to be changed later. So remember this is also where you do this.
If you want to delete a user, you just simply hover over the name of the user and you will be able to see “delete” show up below the name.

Where you delete a user if you need this.
If you click this, the user will no longer have access to your website.
Final thoughts
If you have a WordPress website, it is very likely you at some point need some kind of help with it.
That is why it is great to know how to create a new user. As you can see in this tutorial, it is very easy and fast to do.
The important thing is to just remember to choose the right role of the user and not just automatically give every user administrator access.
Or by accident maybe give them less access than they need, as they can then not do what you need them to do.
Now you know how to do it, and can easily create a new user for WordPress:-)
If you have any comments or questions, I would love to hear from you in a comment below.

