 Sometimes it can be good to be able to hide certain pages or posts on your WordPress website behind a password.
There are all kind of fancy plugins for this and complicated tutorials, but it does not have to be so complicated.
In this short tutorial, I will show you a completely free and very easy way to password protect WordPress pages or posts.
After reading this short step-by-step guide, you will be able to hide the content you want within seconds by using an in-built function in WordPress that is often overlooked.
What can you hide/not hide with this method?
Before showing you how to do use the password function, I just want to clarify what you can use it for, and what you cannot use it for, so you will know, if it is the right option for you.
What you can hide:
 The function I am going to show you is the best way, if you want to just hide some content on a single page or post on your WordPress website.
Let’s imagine you have made a page with content, you want to share with only a select group of people. It could for example be information for a group of colleagues or members of a sports club. You want to have this information on your website, so the people that need to see have easy access to it. But you do not want everybody that visits the website to be able to see it.
You can then use this function and create a password and send this password to everybody that needs access. When they go to the page, all they need to do is then to enter the password, and they will be able to see the content. Nobody else will be able to see it. You can even use the same password for several pages, if it for example is a news section, where you regularly upload internal news just for this group of people. Then the select group will know, that every time, they can just use this same password to see the news.
As I will show you below, this is super easy to do and anyone can do it in less than 30 seconds. BUT it has its limitations, which I just want to make you aware of before you decide to use this function or not.
What you can not hide:
What you have to be aware of before using the method I will show you below is that it is not possible for each member to get their own separate password. You, as the website administrator, will be the one creating the password, and it will be the same password for everyone.
So it is not a way to create a member site, where each member create their own profile, own password, and get their own access. This is definitely possible to create with WordPress, but that cannot be done this easily, so we will save that tutorial for another day.
How to password protect a WordPress page/post (step-by-step)
Now that you are aware what you can use the in-built password function in WordPress for, let’s go through how to do it step-by-step. I have made a small video that shows the steps, but if you prefer seeing it in writing, then just scroll below the video, and follow the steps there:
Step 1: Go to the page or post you want to password protect:
You can use this function for both pages and posts. The way you do it is the same, so I will only show how to do it for a page, and if you want to do it for a post, it is just the exact same steps you need to do.
So the first step is simply to login to your WordPress site and in the back end go to the page or post you want to hide behind a password.
Step 2: Select visibility:
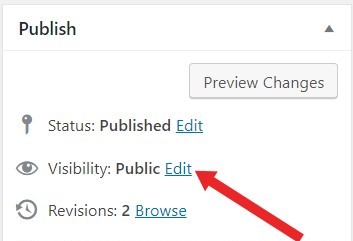
When you are in the edit mode, you will see the box, where you usually publish and update a page, on the right side of your screen. Here you click “edit” next to “visibility”, which as standard is set to public.

Select edit to change the visibility.
Step 3: Create password:
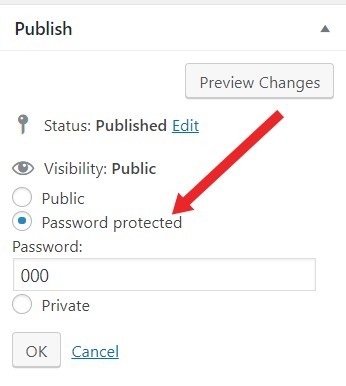
Now you choose that you want the page/post to be password protected (see image below). And then below you write the password you wish. There are no demands to how the password should be – you can make it as short or as long as you like and use both numbers, letters, and special characters.

Create the password you want.
Step 4: Publish the page/post:
After this, you just press publish as you usually would for any other page/post. Now, when somebody visit that particular page/post, they cannot see the content. They will be able to see the headline of the page, so make sure you do not write any secret information here, but all the content is only available to the people with the password. In my example below, I have give the page the title “Content for select members”, so where you can see this, is where your page/post title will show.

How a page/post will look for people without the password.
For the people with the password, it is very easy to log in. They just simply put in the code you gave them and press enter, and the content will show up.
Step 5: Share the password and page with the relevant people:
The last step is to let the people you want to give access know. So you need to send them the password and possibly also a link to the page, if it is not obvious how to find it on the website.
And that is it – it is that easy. It is a function that is very easy to use, but many people overlook it (I did not know about it this function for a long time myself).
Final thoughts
As you can see, it is super easy to password protect a WordPress page or post with the in-built function that is available in WordPress.
If you do not already have a WordPress website and would like to try to make one for free, you can check out my tips about how to start a website for free.
Also, if you need any help or have any questions, feel free to leave a comment below. I will be more than happy to help you out.


Hello Mikael,
Thank You for this post, like they say, you learn something everyday. Informative and right to the point.
Bill
Thank you Bill. Glad you liked the tutorial and learned something.
All the best,
Mikael